
Building a strong wall is a true art form. It requires patience and a deep understanding of your materials. When laying a masonry wall, you create a functional sculpture. This structure must withstand wind and rain for decades. Many beginners think this is a simple weekend project. However, they often find cracking mortar or sagging lines quickly. You must embrace foundational principles to avoid these common pitfalls. Master the subtle nuances of the trade for success.
Have you wondered why ancient stone structures remain standing today? The secret lies in the synergy between units and binder. Preparation happens long before the first stone is set. Whether using bricks or concrete blocks, longevity depends on moisture management. You must also consider the structural load effectively. Follow professional standards to transform raw materials into a boundary. This adds great value and character to your property.
Strength is only as good as your foundation. A solid base ensures even weight distribution across the soil.
The Essential Toolkit and Preparation for Laying a Masonry Wall
Master craftsmen know results depend on their specific instruments. You cannot cut corners with flimsy or cheap equipment. Your primary companion will always be the metal trowel. Developing a consistent trowel technique is a professional hallmark. High-quality steel allows for a smooth, rhythmic motion. This ensures even coverage and very strong adhesion. You also need a level and a mixing tub. For more advice, check these masonry repair tips for homeowners to improve your skills.
Proper preparation involves selecting materials for your specific environment. A stone wall in damp climates requires a unique approach. Consider the layout using batter boards and string lines. This ensures every course remains perfectly plumb and level. Take time to “dry bond” your first course carefully. Lay out blocks without mortar to anticipate needed cuts. This avoids awkward slivers of brick at the corners. The math meets physical reality during this initial stage.
The binder consistency is the glue for your vision. It is the most critical variable in construction.
Perfecting the Mortar Mix for Maximum Durability
Novices often ask about the best mortar mix ratio for brick walls. A mix too rich in cement will crack. One that is too lean will simply crumble. For most tasks, use one part cement and six parts sand. This blend allows the wall to breathe naturally. It moves slightly with temperature changes without losing integrity. Achieving a “creamy peanut butter” consistency is essential. This ensures a strong bond during the brick laying process.
Avoid mixing too much mortar at one single time. Material might harden before you can apply it. Professional masons always mix in small, manageable batches. Keep the mortar shaded from direct sunlight when possible. Concrete blocks might need a stronger Type S mix. Traditional clay bricks usually require softer Type N mortar. These chemical differences ensure your laying a masonry project lasts. The mortar should be weaker than the bricks. This prevents cracking during natural ground settlement.
Essential Masonry Tools Every Beginner Needs
Starting your journey into stonework can feel very overwhelming. Do not worry about every specialized tool available. Focus on the masonry tools every beginner needs first. Buy a high-quality pointing trowel and a masonry hammer. You also need a jointer tool for seams. Use a soft-bristled brush to clean excess debris. Investing in a professional string line is non-negotiable. A sagging line leads to a crooked wall.
| Tool Name | Primary Purpose | Expert Tip |
| London Trowel | Spreading mortar | Look for forged steel blades. |
| Spirit Level | Ensuring plumb lines | Use a 4-foot level. |
| Mason’s Line | Creating straight guides | Keep the line very tight. |
| Jointers | Finishing joints | Choose a concave shape. |
Prepare your site and tools before starting. Then begin the physical process of building upward.
How to Lay a Masonry Wall Step by Step
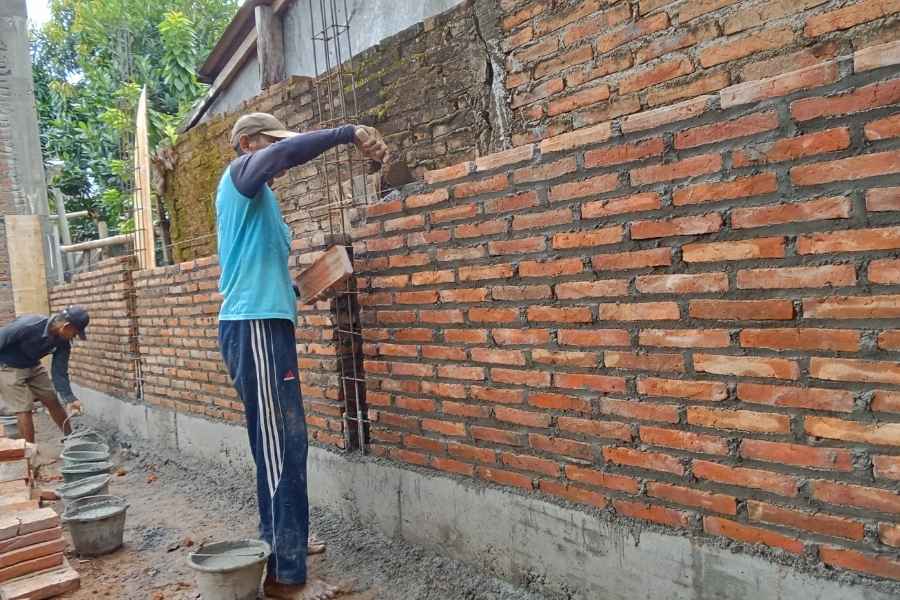
The process of how to lay a masonry wall step by step starts at corners. Build up the “leads” or corners of the wall first. These act as stable anchors for your line. The line then guides the middle brick placement. Tap each unit into place with your trowel handle. Check constantly with your level for vertical accuracy. This rhythmic brick laying requires a very keen eye. Even small deviations cause massive leans later.
Pay close attention to the vertical “perpends” joints. Align or stagger them according to your bond. Try these masonry techniques for a beautiful garden path for inspiration. Using a Running Bond is classic and very sturdy. A stone wall requires a more organic fitting process. Find the “face” of each stone for a puzzle. Maintain a consistent joint thickness of about 10mm. This creates a professional and very clean finish.
Moisture management is the final hurdle for survival. It prevents staining or structural rot over time.
How to Point Joints in a Stone Wall
The final stage involves the crucial pointing joints process. This seals gaps and defends against water ingress. To learn how to point joints in a stone wall, wait for hardness. The mortar should be “thumb-print hard” before you finish. Use a jointer to compress the mix into gaps. This creates a decorative finish and watertight seal. Doing this while wet results in messy smears. Clean the face of the masonry carefully.
| Material | Common Uses | Durability |
| Clay Bricks | Homes, chimneys | High |
| Concrete Blocks | Foundations | Very High |
| Natural Stone | Garden walls | Maximum |
Frequently Asked Questions about Laying a Masonry
What is the most common mistake when laying a masonry wall?
The most frequent error is ignoring the level. Beginners assume they can fix leans later. Masonry is unforgiving once the base is off. Always check your work every few bricks. This ensures the structure remains perfectly stable.
How long does it take for a masonry wall to fully cure?
Mortar feels hard within two days usually. However, the full chemical process takes 28 days. Keep the wall from drying too quickly. Misting the wall with water can help strength. Avoid applying heavy loads during the first week.
Can I lay masonry in the rain or freezing cold?
Avoid laying a masonry project during heavy rain. Water washes cement paste out of the joints. Freezing temperatures expand water and destroy the bond. Work in mild weather for the best results. Use insulation blankets if the temperature drops.
Do I need a concrete foundation for a small garden wall?
Yes, every wall needs a stable footing. This prevents sinking as the ground shifts. Dig a trench and use compacted gravel. A poured concrete strip is even better. Without a foundation, the wall will surely crack.